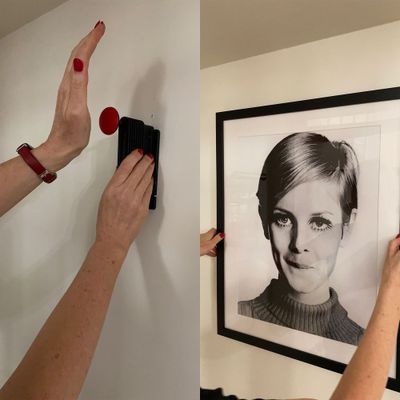
When you admire a particularly great at-home gallery wall — you know, the kind with a bunch of framed pieces hung together just so — on Instagram, you rarely think about the level of care it took to install each piece. Unless you’ve done a gallery wall yourself, that is, and remember the number of holes and uneven patches that live secretly behind your own art.
Take it from me: Gallery-wall hanging is not easy to pull off. I used to hang pictures by hammering a nail into the wall and hoping for the best. Picture-hanging hardware? Why bother! A hammer and any sort of nail, and I was good to go. But when it came to precision, this posed a problem. Nails hammered into the wall at an angle are never at the exact same angle (unless you use picture-hanging hardware), so pictures often end up looking slightly askew and don’t sit flush against the wall. The whole thing looks a bit homemade, and not in a good way.
That was many years ago, before I worked as an interior decorator and understood why the age-old “measure twice, cut once” philosophy can be applied to almost everything. And, most importantly, it was before I knew about the Takker.
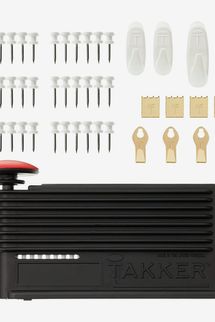
A DIY tool that solves all the above issues, the Takker first came to my attention around 2009 when my mother in Ireland produced one from the cupboard to hang a picture. It had made an appearance on Dragons’ Den (the Shark Tank of Ireland) and soon found its way into Woodie’s DIY (the Home Depot of Ireland). The idea behind it was to invent a super-simple way to hang pictures and mirrors up to 22 pounds on drywall, wood, plaster, and aerated concrete block. To date, there’s a Takker in 10 percent of homes on the Emerald Isle.
Here’s how it works: You mark the spot, load some of the included Takks into the rear of the device, and give a satisfying punch to the large round red button, which pushes a Takk firmly and securely into the wall at an ecstatically perfect 90-degree angle. No risk of accidentally hammering your thumb, no loud repetitive banging sounds, no problem. The red button has a fun game-show feeling, as well.
I have always hung things directly on the Takk, but the Takker kit now comes with brass picture hooks, razor hooks, and large plastic hooks that work in tandem with the Takks. I’ve hung pretty much all my art under 22 pounds using the Takker. I’ve hung art at 11 p.m. without risk of disturbing the neighbors, and I’ve used it to hang the aforementioned precise grid gallery wall-art installation, which went fairly well, despite the most uneven walls imaginable.
The Takks themselves resemble pushpins (but smaller), and when you remove one from the wall, it leaves a 1-mm. hole that’s so tiny you can hardly see it, even when you’re standing right there. As someone who perennially prefers white walls, I can attest to the fact that these holes are practically unnoticeable, even with 20/20 vision. (I’ve used the Takker to hang Christmas decorations, leaving barely visible holes when it was time to take them down.) Although the Takks are hypersecure, they actually slide out very easily via an in-built removal slot in the device, so they can be reused. In lazier times, I’ve used a hammer hook to get them out, which leaves a scuff mark on the wall. Will I ever learn? Don’t be like me, your lazy friend; use the Takker slot. It’s there for a reason.
Just note: The Takker works amazing on drywall and wood, but it doesn’t work on exposed brick or exposed concrete block. That said, following the success of the original, the company invented a second version called the Hardwall Takker that can handle brick and even ceramic tile. Amazing! Maybe I’ll test it out. Stay tuned.
The Strategist is designed to surface the most useful, expert recommendations for things to buy across the vast e-commerce landscape. Some of our latest conquests include the best acne treatments, rolling luggage, pillows for side sleepers, natural anxiety remedies, and bath towels. We update links when possible, but note that deals can expire and all prices are subject to change.
